iOS UI Kit Quickstart
UI Kit is a quick and hassle free way to set up chat using ChatCamp, It contains all the basic UI components which are required to setup the chat UI.
How to setup
There are a few steps by following which you can set up chat in no time. This guide assumes that you have already registered yourself on ChatCamp dashboard and got the App ID.
1) Add UI Kit in Podfile
First, you need to add ChatCamp UI Kit to your Podfile. Add these lines to your Podfile.
pod 'ChatCampUIKit', '~> 4.2'
Save the Podfile and run the following command in your project directory:
pod install
2) Initialise ChatCampUIKit
You need to initialize ChatCamp and connect to it.
Do this in your AppDelegate.swift
import ChatCamp
import ChatCampUIKit
import UserNotifications
Do this in your AppDelegate.swift
class AppDelegate: UIResponder, UIApplicationDelegate {

    var groupChannelId = ""

    func application(_ application: UIApplication, didFinishLaunchingWithOptions launchOptions: [UIApplication.LaunchOptionsKey: Any]?) -> Bool {

        setupChatCampSDK()
        initializeNotificationServices()
        CCPClient.addChannelDelegate(channelDelegate: self, identifier: AppDelegate.string())

        return true
    }

    func applicationDidEnterBackground(_ application: UIApplication) {
        CCPClient.disconnect { _ in
            CCPClient.addConnectionDelegate(connectionDelegate: self, identifier: AppDelegate.string())
        }
    }

    func applicationWillEnterForeground(_ application: UIApplication) {
        if let userID = UserDefaults.standard.userID() {
            CCPClient.connect(uid: userID) { (_, _) in }
        }
    }

    func application(_ application: UIApplication,
                     didRegisterForRemoteNotificationsWithDeviceToken deviceToken: Data) {
        let tokenParts = deviceToken.map { data -> String in
            return String(format: "%02.2hhx", data)
        }

        let token = tokenParts.joined()
        UserDefaults.standard.setDeviceToken(deviceToken: token)
        print("Device Token: \(token)")
    }

    func application(_ application: UIApplication,
                         didFailToRegisterForRemoteNotificationsWithError error: Error) {
        print("Device token for push notifications: FAIL -- ")
        print(error)
    }

    func initializeNotificationServices() -> Void {
        UNUserNotificationCenter.current().delegate = self
        let authOptions: UNAuthorizationOptions = [.alert, .badge, .sound]
        UNUserNotificationCenter.current().requestAuthorization( options: authOptions, completionHandler: {_, _ in })

        // This is an asynchronous method to retrieve a Device Token
        // Callbacks are in AppDelegate.swift
        // Success = didRegisterForRemoteNotificationsWithDeviceToken
        // Fail = didFailToRegisterForRemoteNotificationsWithError
        UIApplication.shared.registerForRemoteNotifications()
    }

    fileprivate func setupChatCampSDK() {
    		// Please replace Your App Id here
        CCPClient.initApp(appId: "Your App Id")
    }
}

// MARK:- CCPChannelDelegate
extension AppDelegate: CCPChannelDelegate {

    func channelDidReceiveMessage(channel: CCPBaseChannel, message: CCPMessage) {
        if CCPClient.getCurrentUser().getId() != message.getUser().getId() && channel.getId() != currentChannelId && channel.isGroupChannel() {

            let center = UNUserNotificationCenter.current()
            center.delegate = self

            let content = UNMutableNotificationContent()
            if (channel as? CCPGroupChannel)?.getParticipantsCount() ?? 0 > 2 {
                content.title = channel.getName()
                content.subtitle = message.getUser().getDisplayName() ?? ""
            } else {
                content.title = message.getUser().getDisplayName() ?? ""
            }
            content.sound = UNNotificationSound.default
            content.userInfo = ["channelId": channel.getId()]
            let messageType = message.getType()
            if messageType == "attachment" {
                content.body = "Attachment Received"
            } else {
                content.body = message.getText()
            }

            let trigger = UNTimeIntervalNotificationTrigger(timeInterval: 0.01, repeats: false)
            let request = UNNotificationRequest(identifier: message.getId(), content: content, trigger: trigger)

            center.add(request) { (error) in
                if error != nil {
                    print("error \(String(describing: error))")
                }
            }
        }
    }

    func channelDidChangeTypingStatus(channel: CCPBaseChannel) { }

    func channelDidUpdateReadStatus(channel: CCPBaseChannel) { }

    func channelDidUpdated(channel: CCPBaseChannel) { }

    func onTotalGroupChannelCount(count: Int, totalCountFilterParams: TotalCountFilterParams) { }

    func onGroupChannelParticipantJoined(groupChannel: CCPGroupChannel, participant: CCPUser) { }

    func onGroupChannelParticipantLeft(groupChannel: CCPGroupChannel, participant: CCPUser) { }
}

// User Notifications
extension AppDelegate: UNUserNotificationCenterDelegate {
    public func userNotificationCenter(_ center: UNUserNotificationCenter, didReceive response: UNNotificationResponse, withCompletionHandler completionHandler: @escaping () -> Void) {
        if let userInfo = response.notification.request.content.userInfo as? [String: Any], let channelId = userInfo["channelId"] as? String {
            groupChannelId = channelId
            if !(response.notification.request.trigger?.isKind(of: UNPushNotificationTrigger.self) ?? true) {
                let userID = CCPClient.getCurrentUser().getId()
                let username = CCPClient.getCurrentUser().getDisplayName()

                let sender = Sender(id: userID, displayName: username!)
                CCPGroupChannel.get(groupChannelId: self.groupChannelId) {(groupChannel, error) in
                    if let channel = groupChannel {
                        let chatViewController = ChatViewController(channel: channel, sender: sender)
                        // push the chatViewController on your navigation controller here so the user is redirected to Chat Screen directly.
                        // For instance in our example app
                        // let homeTabBarController = UIViewController.homeTabBarNavigationController()
                        // WindowManager.shared.window.rootViewController = homeTabBarController
                        // homeTabBarController.pushViewController(chatViewController, animated: true)
                    }
                }
            }
        }

        completionHandler()
    }

    public func userNotificationCenter(_ center: UNUserNotificationCenter, willPresent notification: UNNotification, withCompletionHandler completionHandler: @escaping (UNNotificationPresentationOptions) -> Void) {
        completionHandler([.alert, .sound, .badge]) //required to show notification when in foreground
    }
}

// This delegate is called when application resumes in foreground state from background state
extension AppDelegate: CCPConnectionDelegate {
    func connectionDidChange(isConnected: Bool) {
        CCPClient.removeConnectionDelegate(identifier: AppDelegate.string())
        if isConnected && !groupChannelId.isEmpty {
            DispatchQueue.main.async {
                let userID = CCPClient.getCurrentUser().getId()
                let username = CCPClient.getCurrentUser().getDisplayName()

                let sender = Sender(id: userID, displayName: username!)
                CCPGroupChannel.get(groupChannelId: self.groupChannelId) {(groupChannel, error) in
                    if let channel = groupChannel {
                        let chatViewController = ChatViewController(channel: channel, sender: sender)
                        // push the chatViewController on your navigation controller here so the user is redirected to Chat Screen directly.
                        // For instance in our example app
                        // let homeTabBarController = UIViewController.homeTabBarNavigationController()
                        // WindowManager.shared.window.rootViewController = homeTabBarController
                        // homeTabBarController.pushViewController(chatViewController, animated: true)
                    }
                }
            }
        }
    }
}
Connect with ChatCamp
The connection should be established as soon as you have your USER_ID available. Preferably just after user logs in your app (first login) or in AppDelegate.swift file's didFinishLaunchingWithOptions UIApplication delegate method if the user is already logged in into the app and running the app again and again by killing and restarting it.
CCPClient.connect(uid: userID) { (user, error) in
    DispatchQueue.main.async {
        if error == nil {
        		// Connection Successfull
            if let deviceToken = UserDefaults.standard.deviceToken() {
                CCPClient.updateUserPushToken(token: deviceToken) { (user, error) in
                    if error == nil {
                    		// Device token successfully updated on the server
                    } else {
                    	 // Either show error or do any relevant stuff here
                    }
                }
            }
            // Redirect User to relevant Screen
        } else {
            // Either show error or Redirect User to relevant Screen
        }
    }
}
Once the initial code of setting up is done we can concentrate on integrating the UI components. There are 2 major screens, first is to show the list of conversations and second is the conversation screen itself.
Show List of Recent Conversations
For showing the list of recent conversations we will use storyboard based UIView Controller.
- Add view controller to your storyboard
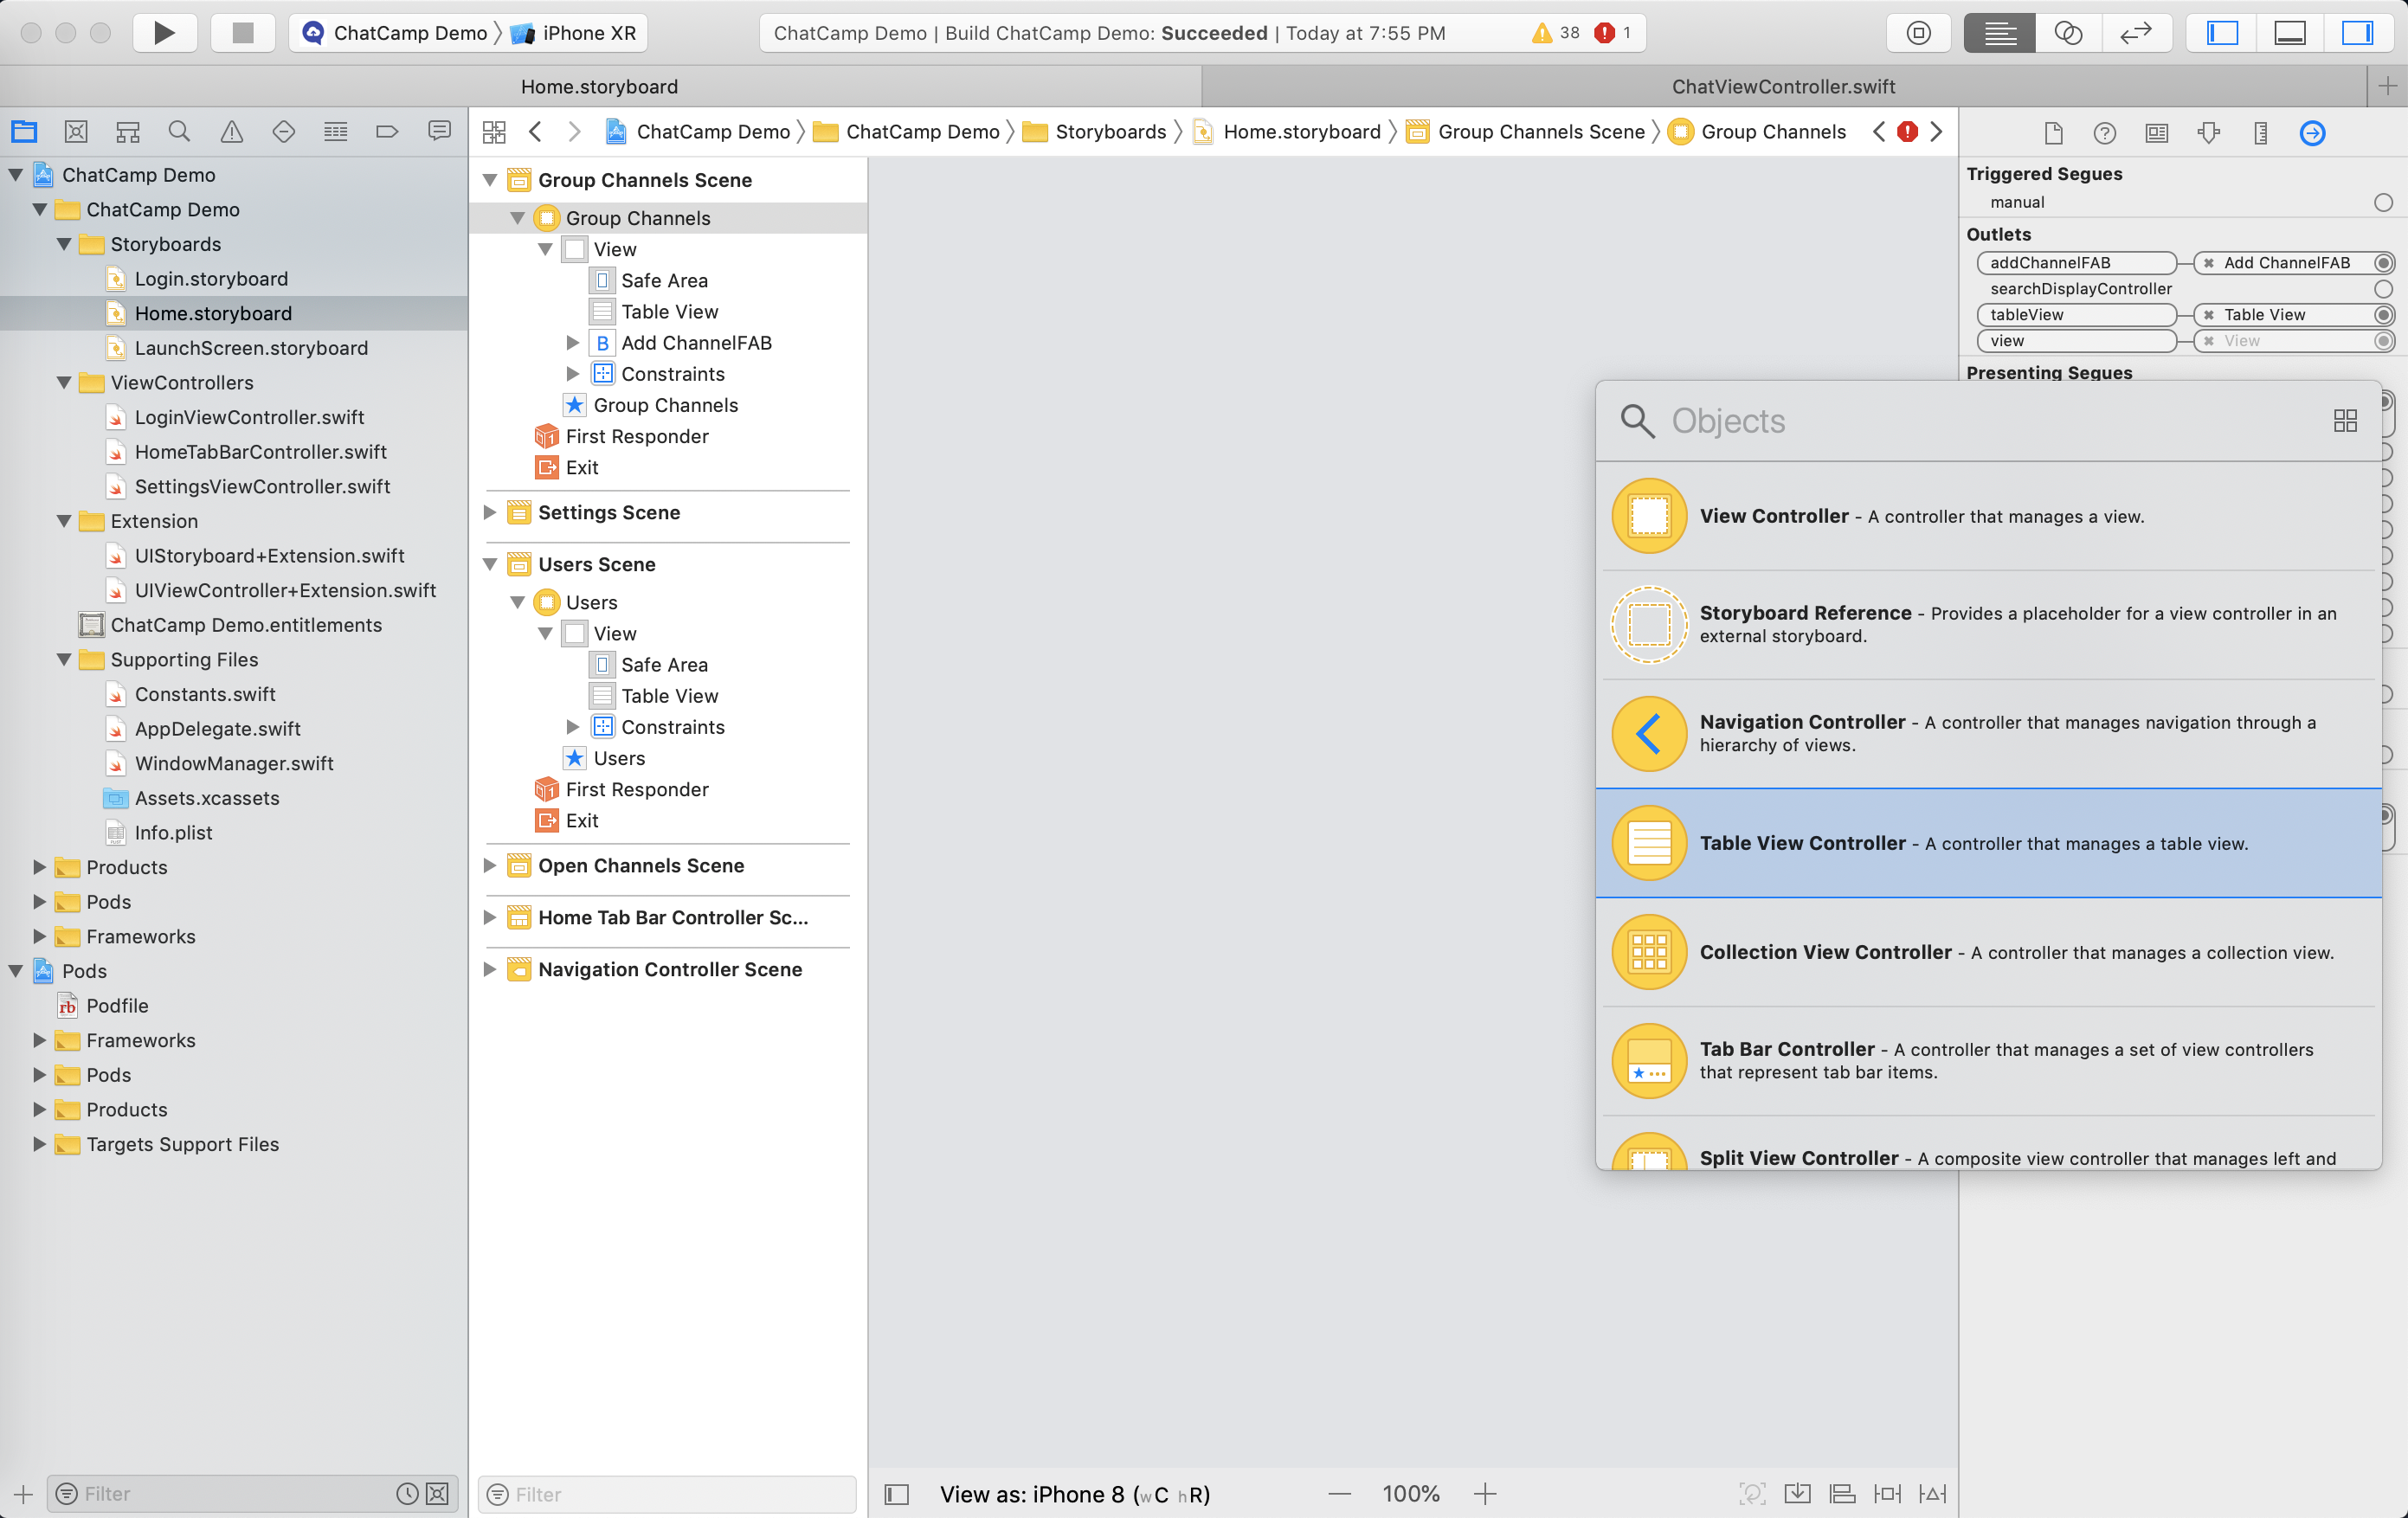
Drag and drop a new Table View Controller scene into your storyboard. Please refer below screenshot for it.
- After including new table view controller scene, please modify class, Module, Storyboard Id and Restoration Id from Identity Inspector. Please refer below screenshot to set the following values in it -
class - GroupChannelsViewController
Module - ChatCampUIKit
Storyboard Id - GroupChannelsViewController
Restoration Id - GroupChannelsViewController
Check the Use Storyboard Id option (It will automatically assign Restoration Id)
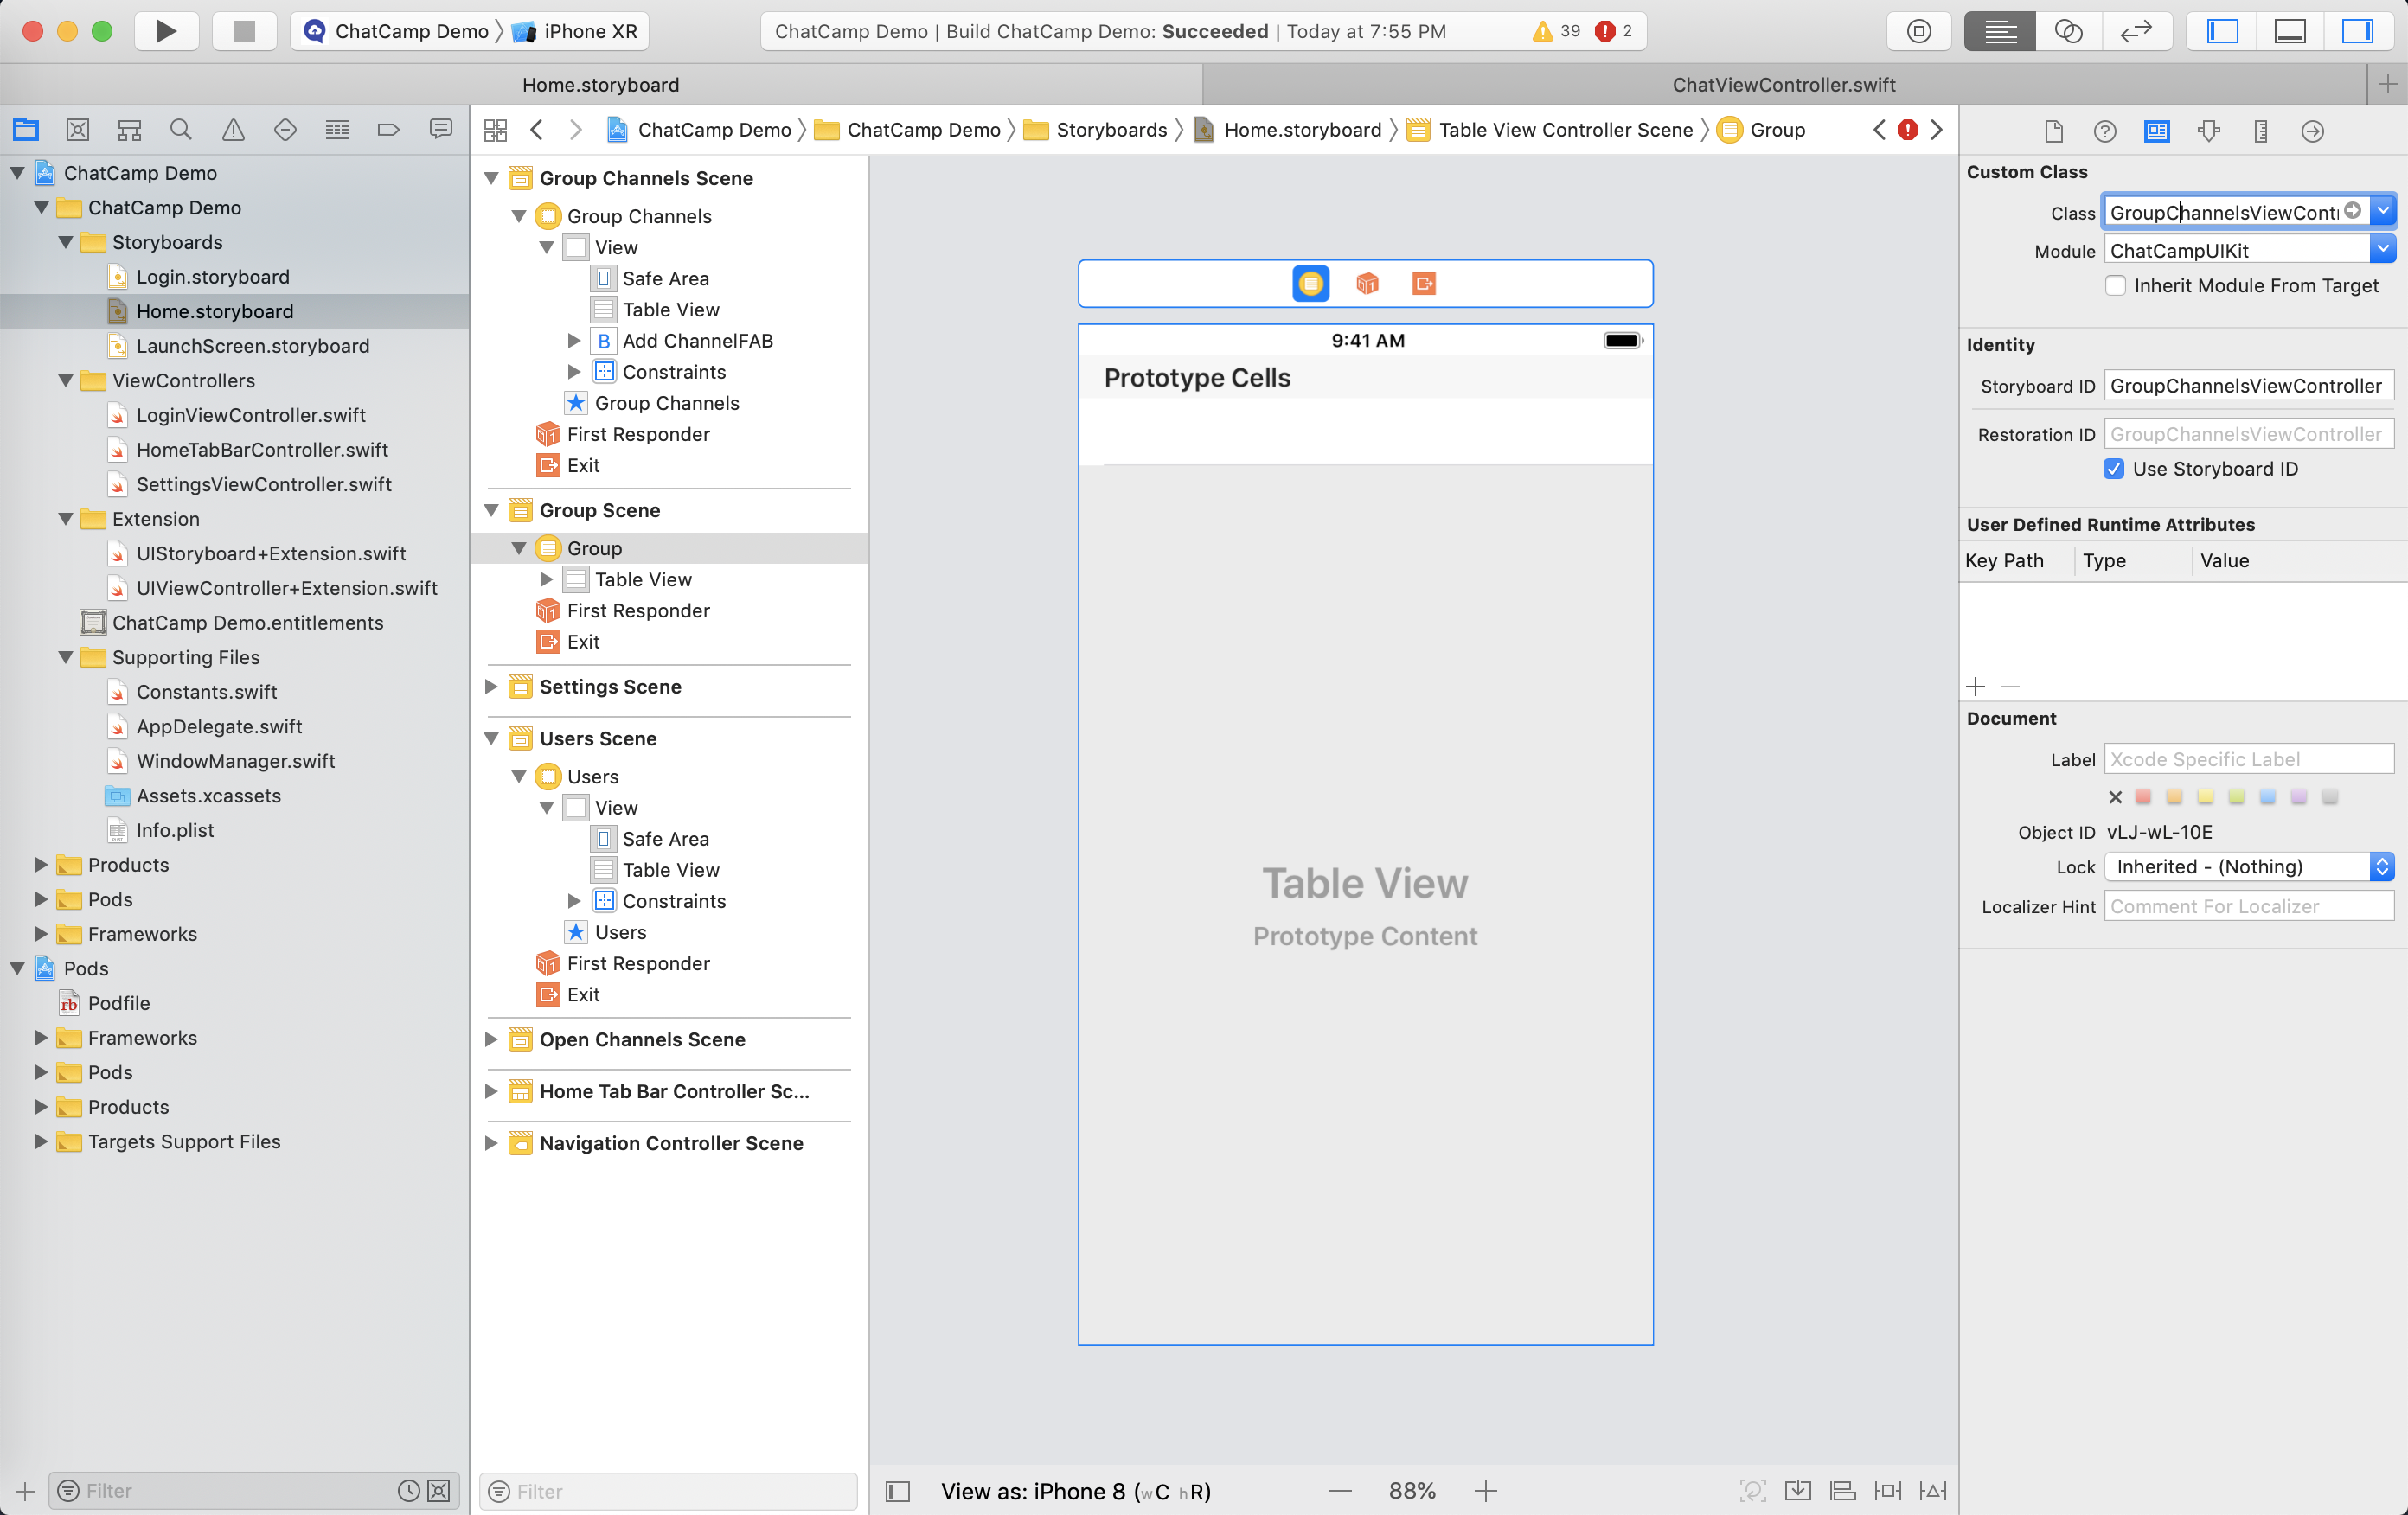
That is it. After doing this, you can present/push the GroupChannelViewController by initializing it's instance from the storyboard or using segues from the relevant screen in your app (Maybe just after you Connect to ChatCamp depending upon your use-case) and you should start seeing the list of recent conversations. You can tap on any recent conversation and start the conversation.
Show List of Open Channel Conversations
This is same what we did in case of recent conversations. For showing the list of open channel conversations we will again use storyboard based UIView Controller.
- Add view controller to your storyboard
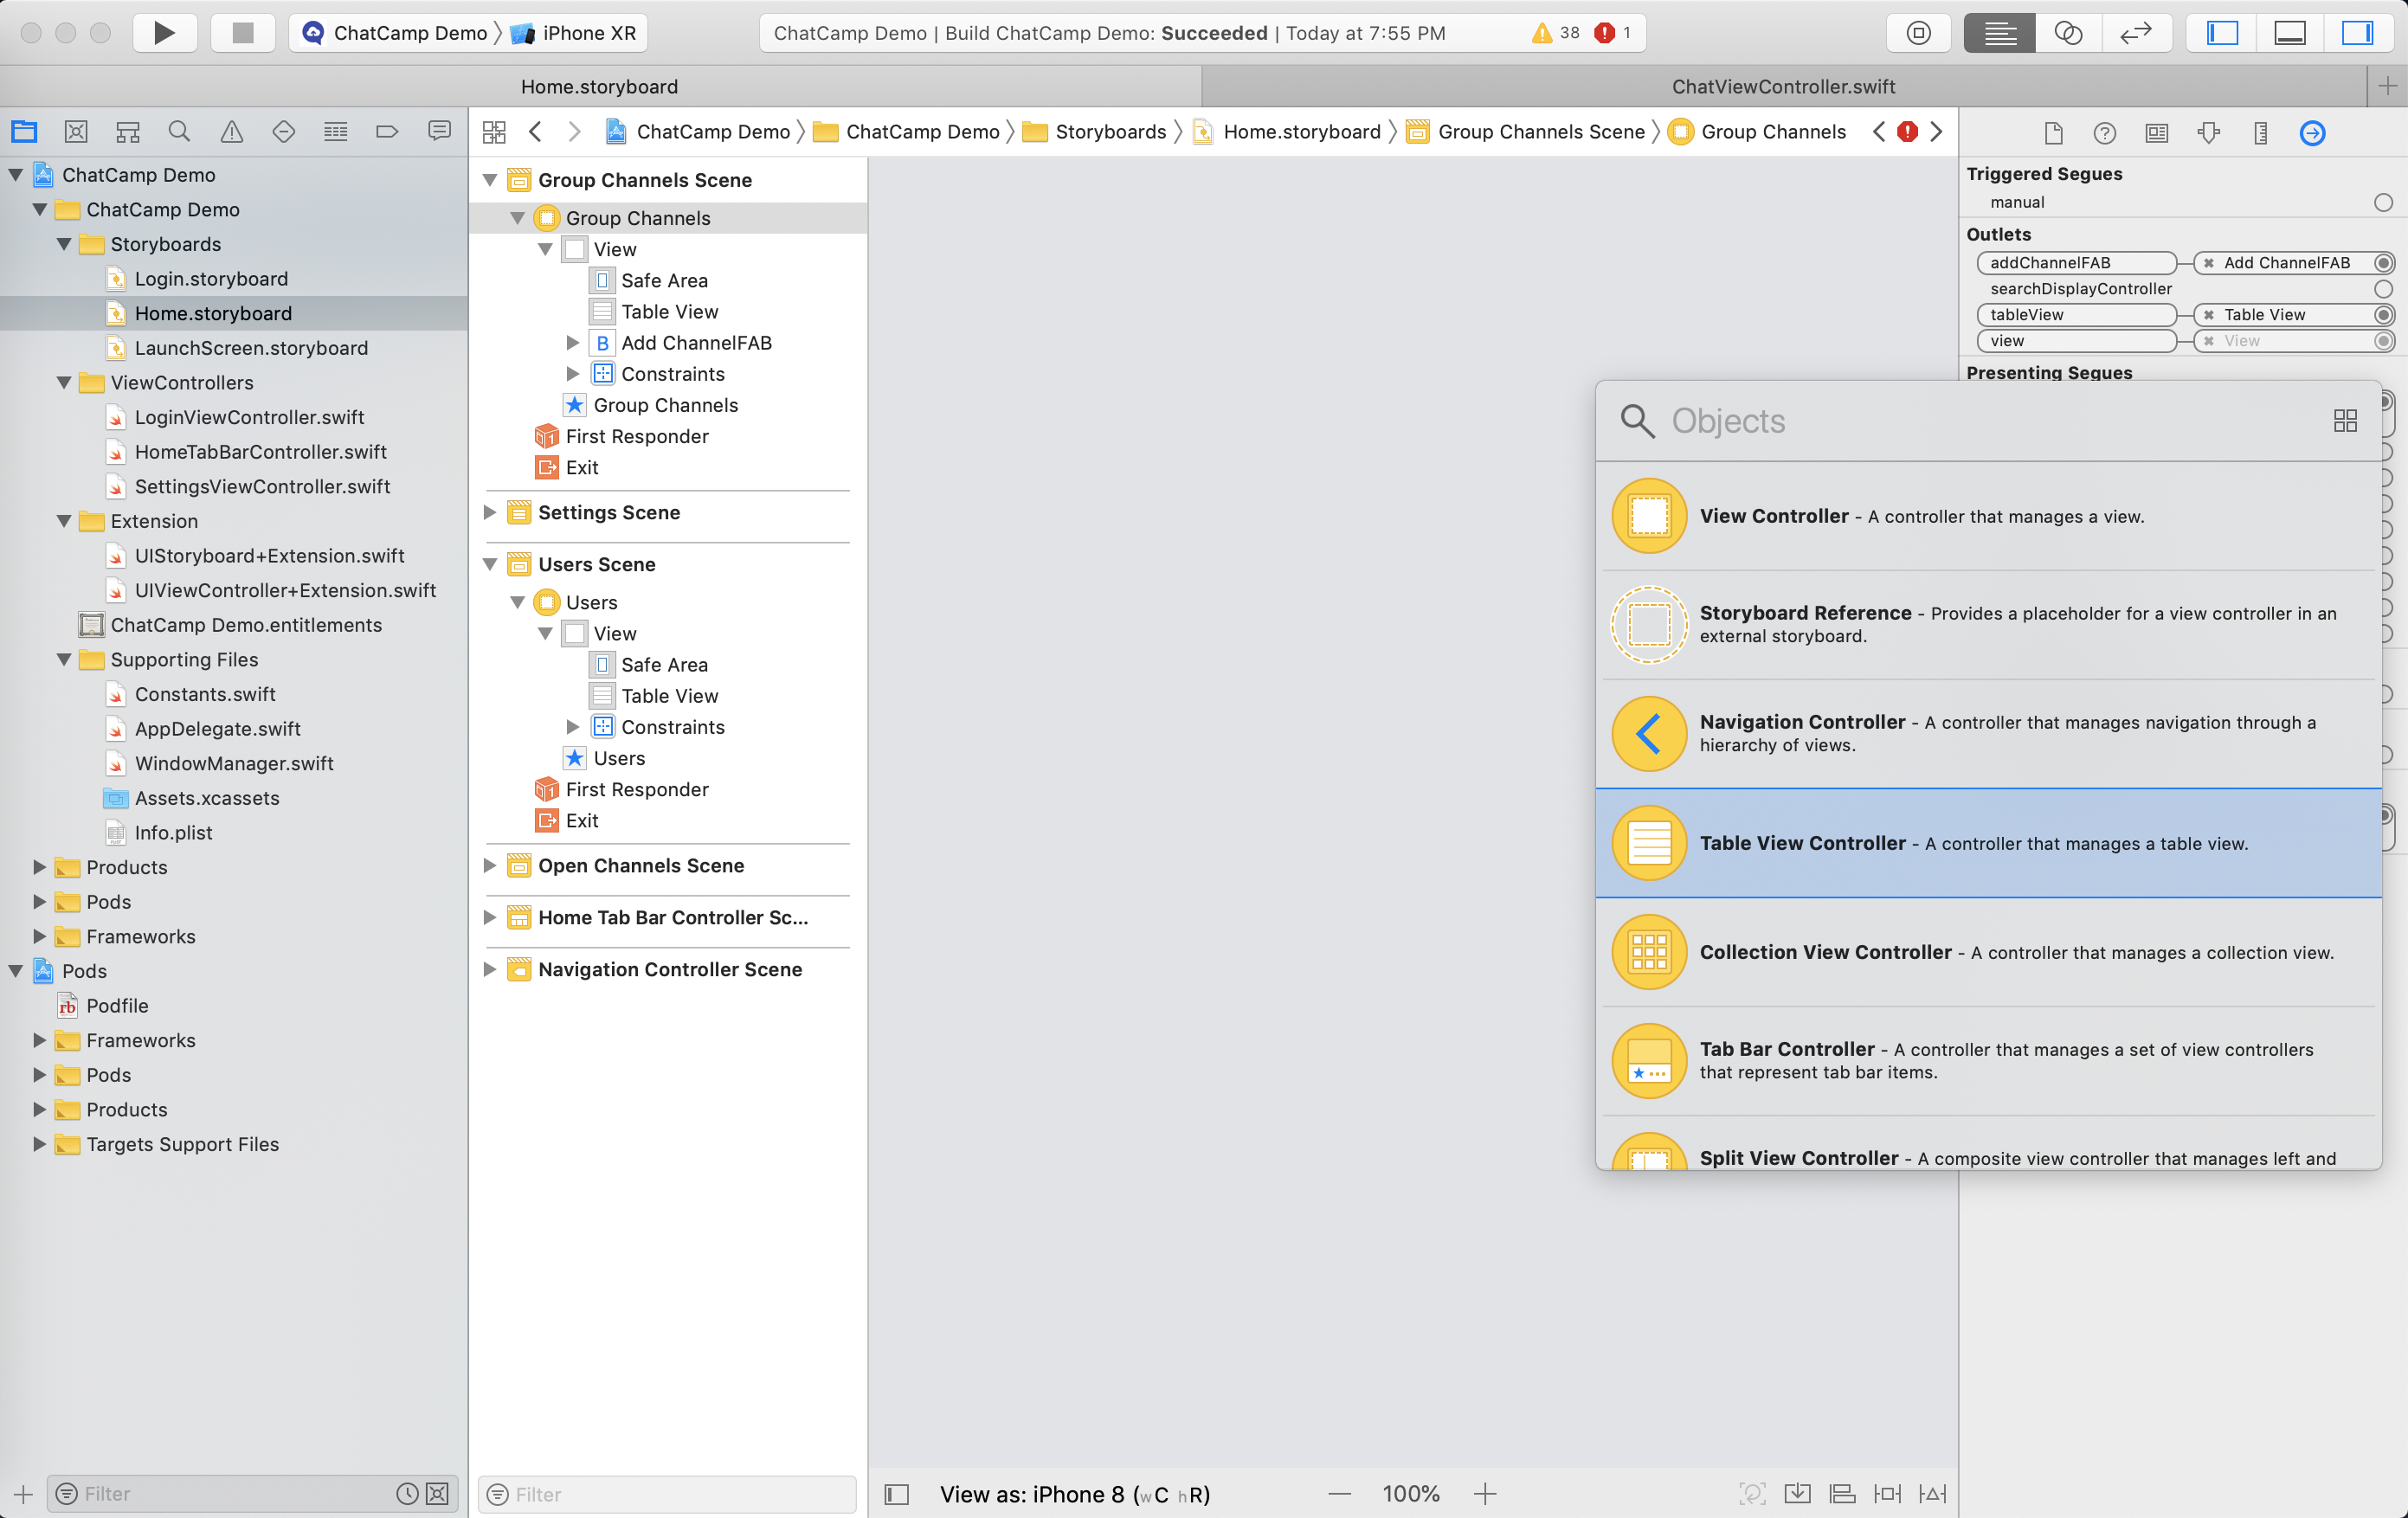
Drag and drop a new Table View Controller scene into your storyboard. Please refer below screenshot for it.
- After including new table view controller scene, please modify class, Module, Storyboard Id and Restoration Id from Identity Inspector. Please refer below screenshot to set the following values in it -
class - OpenChannelsViewController
Module - ChatCampUIKit
Storyboard Id - OpenChannelsViewController
Restoration Id - OpenChannelsViewController
Check the Use Storyboard Id option (It will automatically assign Restoration Id)
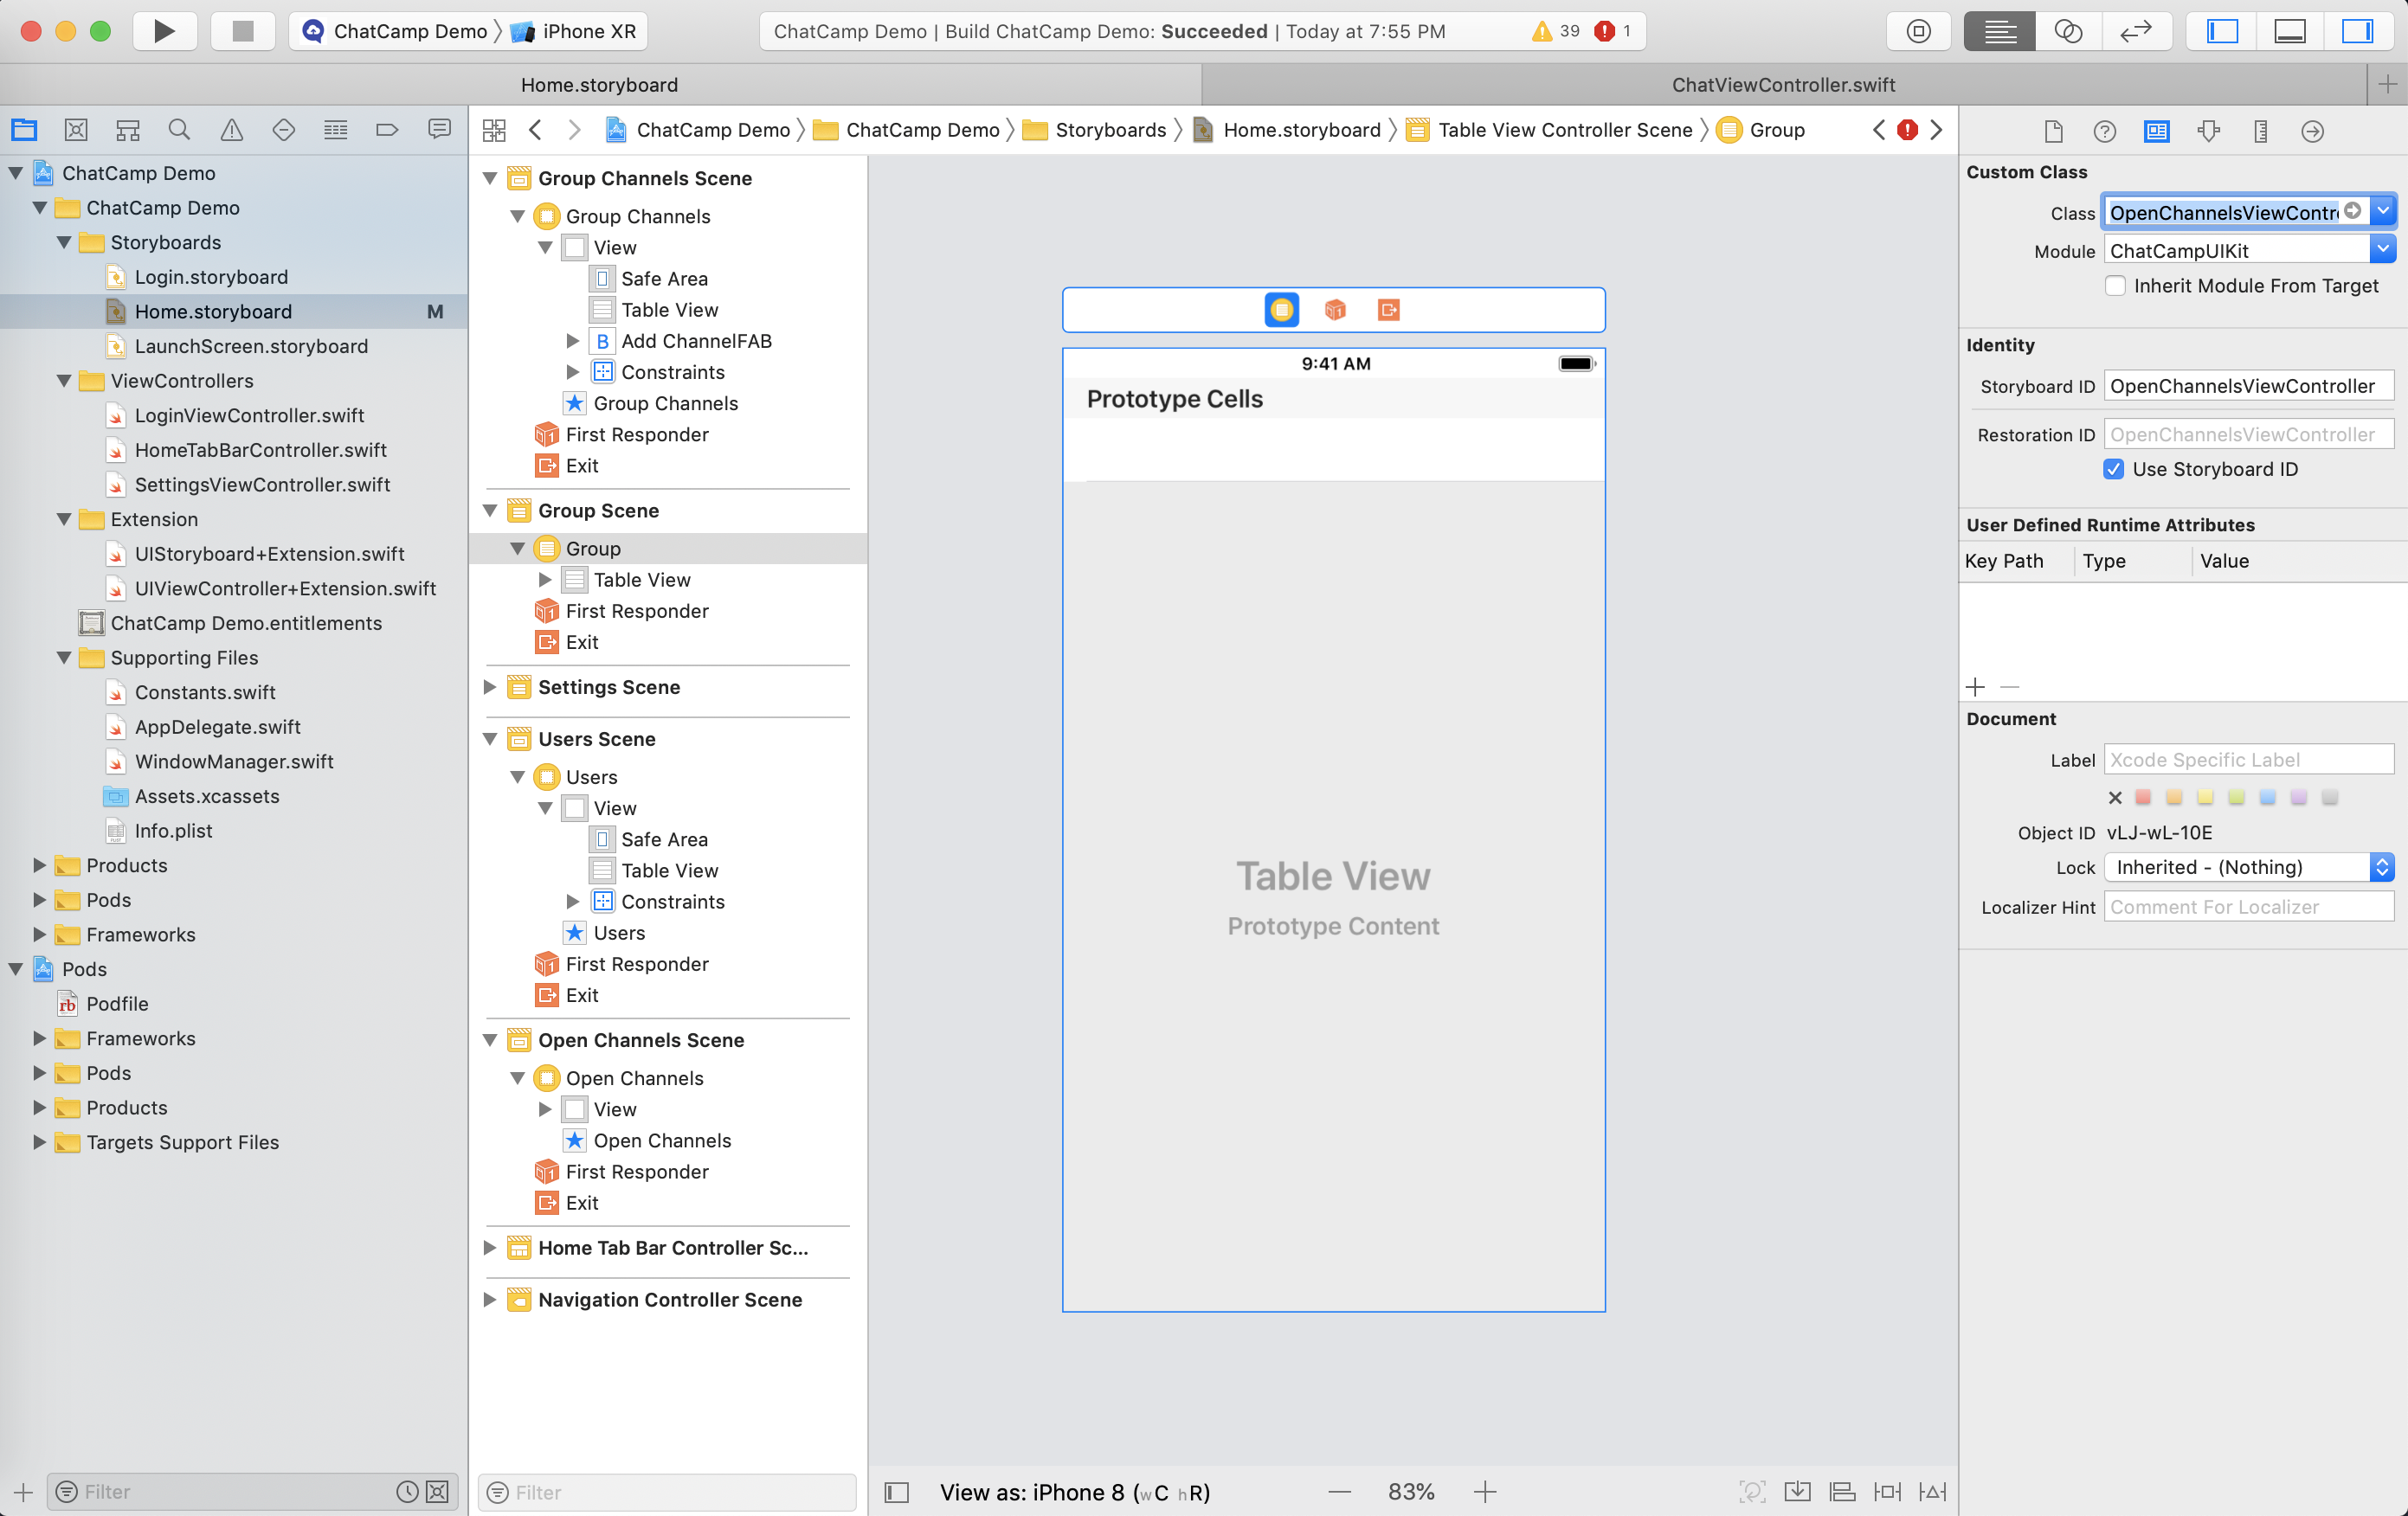
That is it. After doing this, you can present/push the OpenChannelsViewController by initializing it's instance from the storyboard or using segues from the relevant screen in your app (Maybe just after you Connect to ChatCamp depending upon your use-case) and you should start seeing the list of open channel conversations. You can tap on any open channel conversation/discussion and start messaging in it.
Show List of Users
This is same what we did in case of recent conversations. For showing the list of users we will again use storyboard based UIView Controller.
-
Add view controller to your storyboard
Drag and drop a new Table View Controller scene into your storyboard the same way did for Recent Conversations or Open Channel Conversations -
After including new table view controller scene, please modify class, Module, Storyboard Id and Restoration Id from Identity Inspector. Please refer below screenshot to set the following values in it -
class - UsersViewController
Module - ChatCampUIKit
Storyboard Id - UsersViewController
Restoration Id - UsersViewController
Check the Use Storyboard Id option (It will automatically assign Restoration Id)
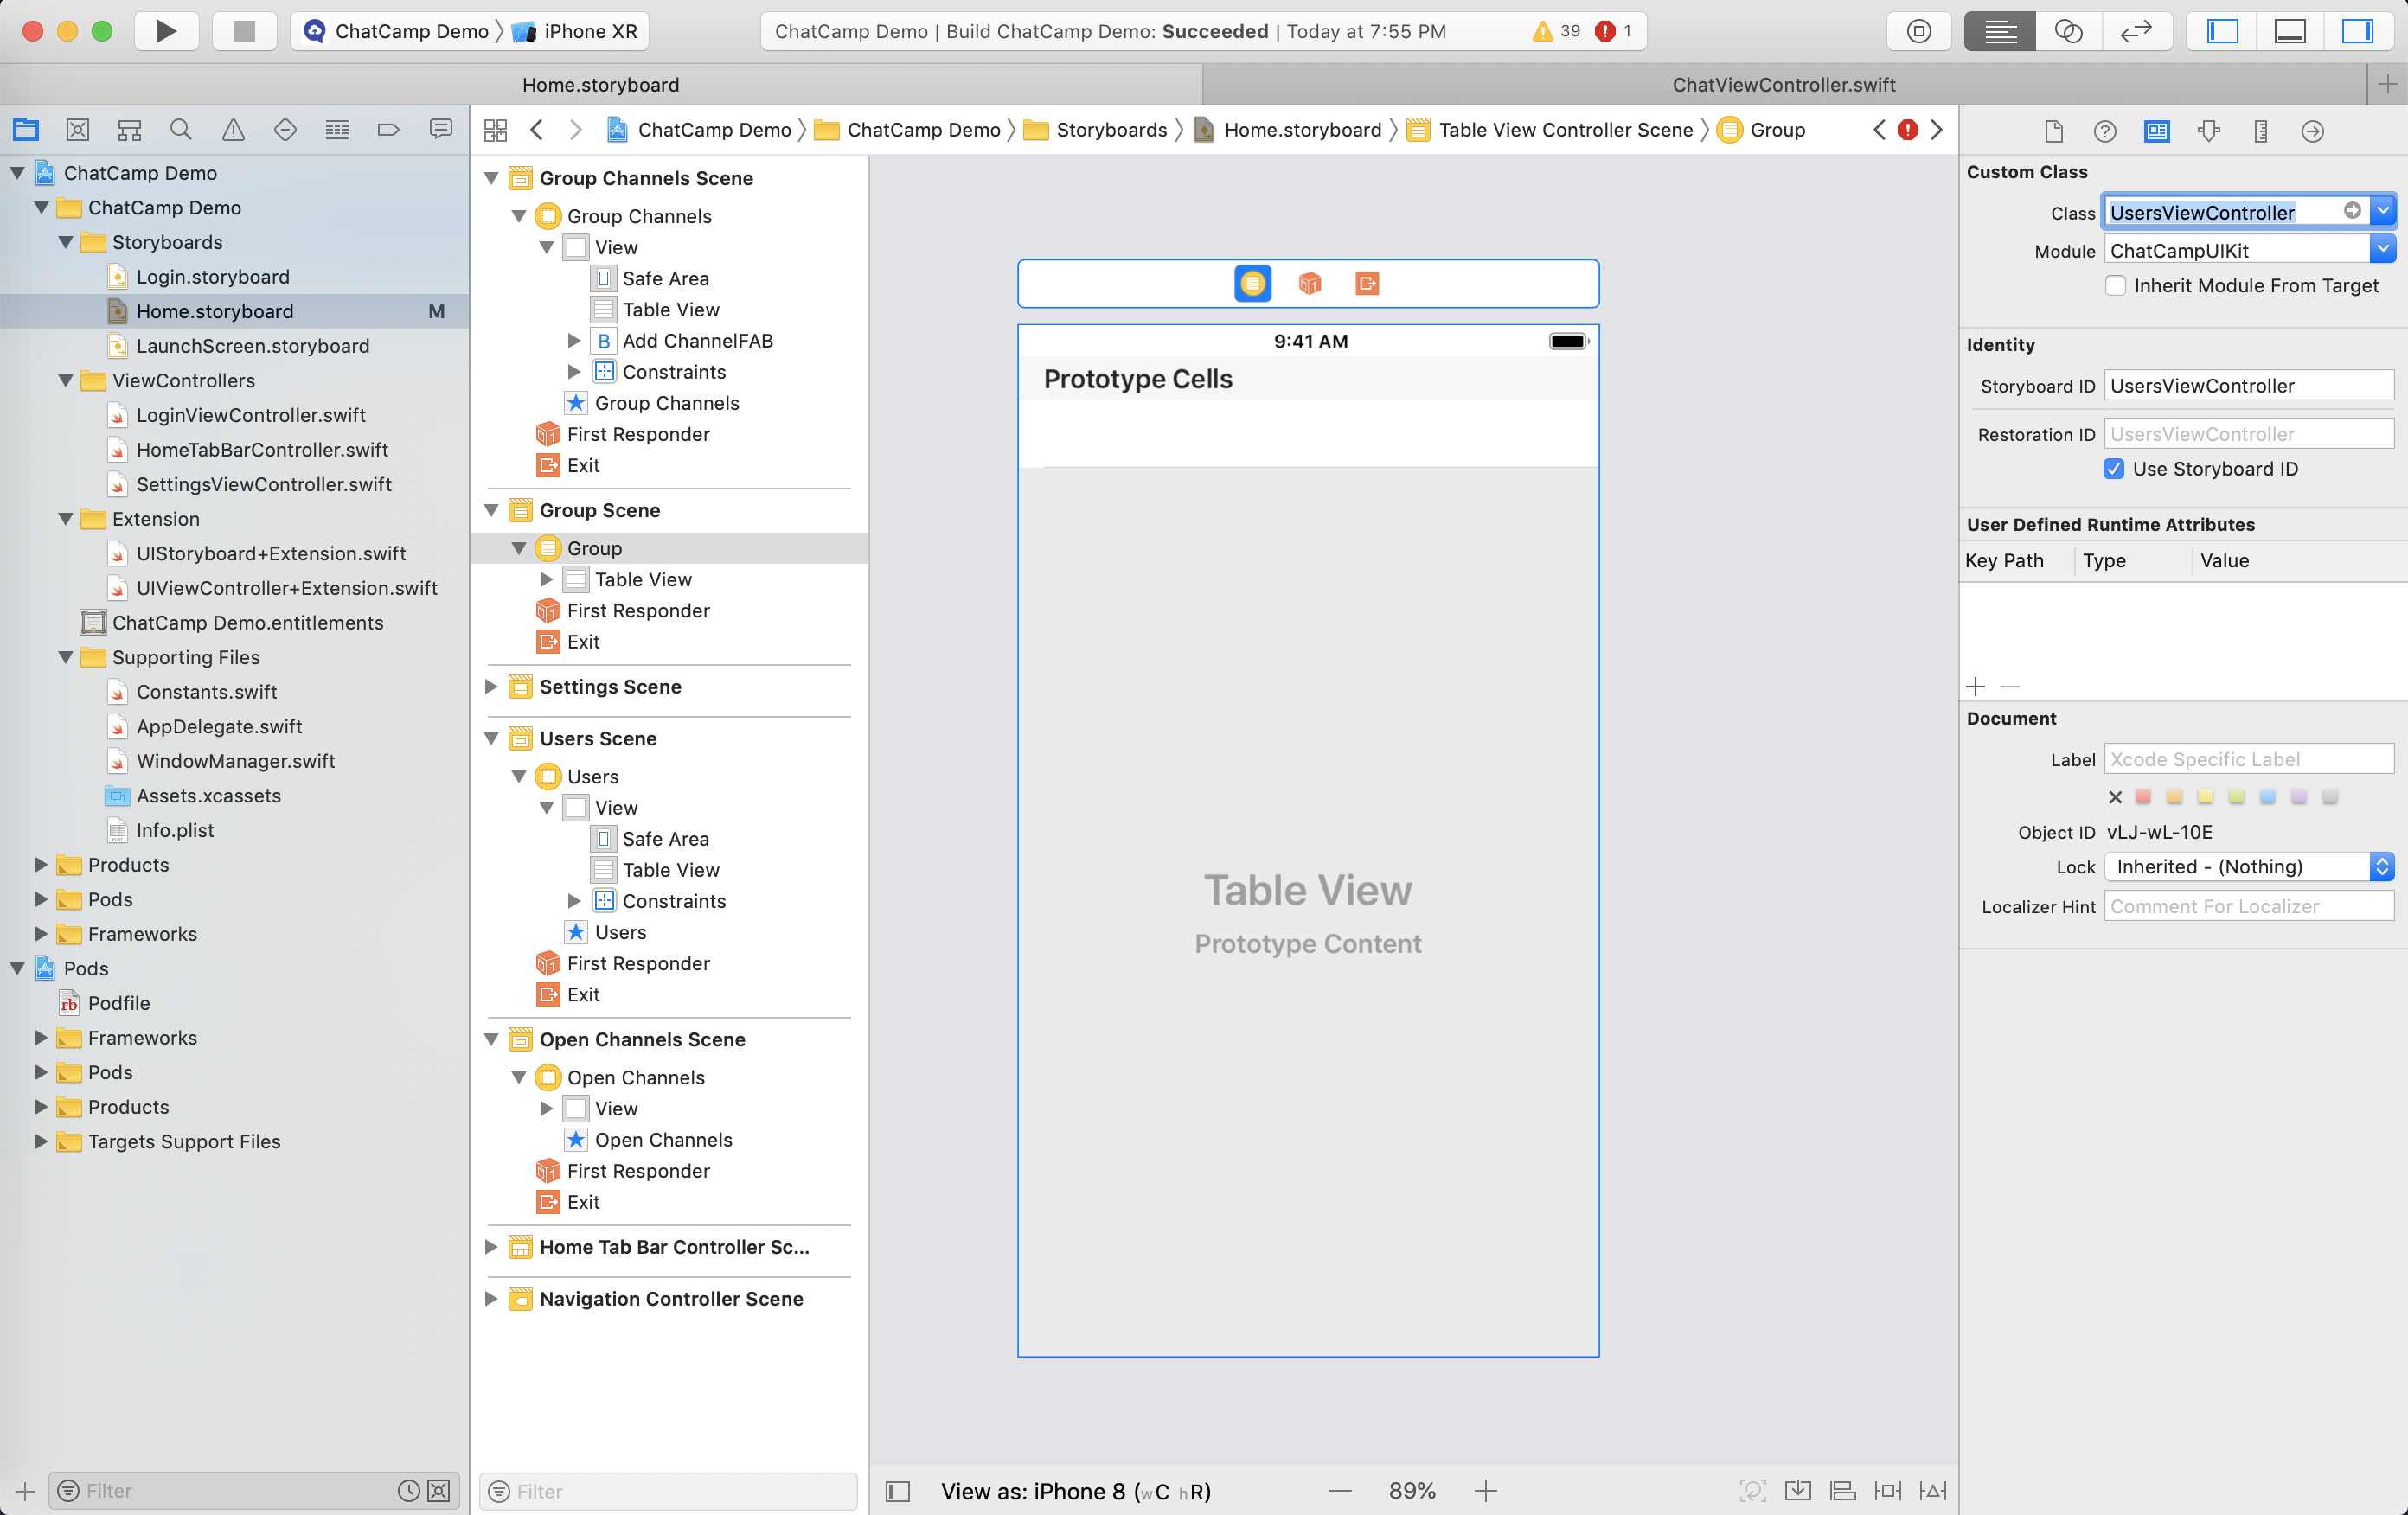
That is it. After doing this, you can present/push the UsersViewController by initializing it's instance from the storyboard or using segues from the relevant screen in your app (Maybe just after you Connect to ChatCamp depending upon your use-case) and you should start seeing the list of users. You can start to chat with a user by tapping on it.
Advanced Settings
You can configure some advanced options like setting a background image on the chat screen, enable/disable voice recording option and attachments on the chat screen.
Set background image on the chat screen
To set a background image on the chat screen, you need to add all device sizes image in Asset.xcassets.
Once the images are added there, do this in your AppDelegate.swift
func application(_ application: UIApplication, didFinishLaunchingWithOptions launchOptions: [UIApplication.LaunchOptionsKey: Any]?) -> Bool {

        // Other code
        backgroundImage = UIImage(named: "Your Image Name Here")

        return true
    }
Enable/Disable Voice Recording and Attachment Features on Chat Screen
To enable/disable voice recording and attachment features on the chat screen, you need to set below properties to true/false (default is true) on ChatViewController.swift (Recent/Group Chat) or OpenChannelsChatViewController.swift (Open Channel Chat) objects depending upon your requirements.
// To hide voice recording and attachment features from Recent/Group Chat
// Please note chatViewController is your object instantiated from ChatViewController.swift and it can be named anything

chatViewController.enableAttachments = false
chatViewController.enableVoiceRecording = false


// Simillarly to hide voice recording and attachment features from Open Channel Chat
// Please note openChannelChatViewController is your object instantiated from OpenChannelChatViewController.swift and it can be named anything

openChannelChatViewController.enableAttachments = false
openChannelChatViewController.enableVoiceRecording = false
Updated less than a minute ago
